


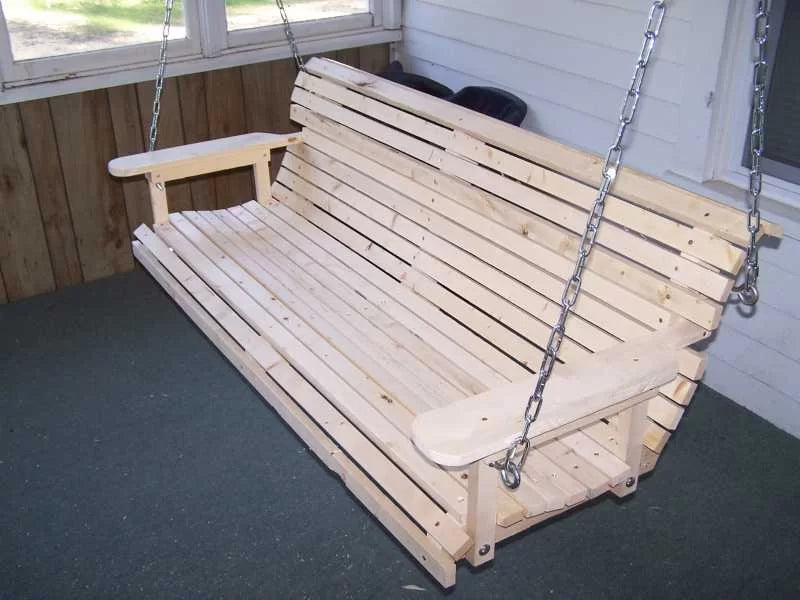
One of my favorite woodworking projects was building my own homemade porch swing. Not only can these be very relaxing on a nice summer evening, but I found that building one is a fun and easy project. Nothing is more rewarding than building something that you know is going to see a lot of use. The wooden porch swing that I describe in this article can be built by the novice woodworker using the most basic tools and materials.

Materials for the Homemade Porch Swing
I built my porch swing using pine because it is inexpensive and easy to work with. Most of the parts in the porch swing are made from standard 2x4 construction lumber. The arm rests and supports are made from a 1x6. All of the hardware needed for construction and installation is available in any hardware store. The only tools required are a table saw, a sander and a jig saw. Other tools are helpful but not required.
Creating the Supports
The first step was to cut out the bench supports. There are three back supports and three bottom supports, all of which are the same. To start these pieces, I cut 6 pieces of 2x4 that were 19 1/4" long. I roughly cut it out from each of the six pieces using my jigsaw. This would have been easier with a band saw but I didn't have one at the time.

After cutting each of the six supports out, I clamped them all together with my pipe clamps. This allowed me to get them all lined up together. I then used my hand held sander to sand across all of them at once to get them all to the same shape. The actual shape that these are is less important than the fact that they are all the same.

Once the supports were all shaped, I paired them up and bolted them together. For this I used 2 4" long, 3/8" nuts and bolts per pair. I first drilled two 3/8" holes in one of the supports and then lined the two pieces up and used the two holes in the first one as a guide for drilling the holes in its mate. Once the holes were drilled, I fastened each pair with the two 3/8" nuts and bolts.
At this point I moved the supports to the porch so that I could do the assembly on site. I set the supports out on the floor and spaced them at the distance for how I wanted the porch swing to come out. I set them 26" apart.
Making the Slats
The next step in this project was to start making the slats. The slats for my swing were 3/4" thick and 57" long. After ripping each slat on the table saw from 2x4s, they needed to be smoothed out, since the saw blade of the table saw doesn't leave a very clean face. The way I did this was by running them through my thickness planer a few times on both sides.
Another way to smooth out the slats would be to sand them out with a power sander. By going through different grits of sand paper, a smoother finish could be achieved. I decided that I was happy with how they turned out by just running them through my planer.

Attaching the Slats
Attaching the first two slats is where the porch swing starts to come together. With the supports set out on the floor, I attached the top and the bottom slats to the supports with 1 1/2" construction screws. For each screw I first pre-drilled through with a small drill bit and then drilled deep enough to sink the head with a counter-sink bit.
After the first two slats were screwed in place, I continued making and attaching slats to the supports while using a piece of 1/4" plywood to get even spacing between them. This part of the project was a little repetitive as there were a lot of these slats to make but with each slat I screwed in place, I got to see the project get closer to a porch swing.


Making the Arm Rests
The last portion of construction was creating the arm rests. The first part of this was to create the top pieces. There are two of these so I started by cutting two pieces of 1x6 23 1/2" long. I then drew the shape onto one of them. To save some time and make sure both pieces were identical, I clamped the two pieces together and cut both of them at once. For this I again used my jig saw. I cut near the line and then used my sander to sand them closer and to get them both to the same shape.


Making the Arm Rest Supports
The next thing was to create the arm rest support pieces. These consisted of four vertical pieces, cut from 2x4s, that were 7/8" x 1 1/2" x 19 1/2" and four horizontal supports, also cut from 2x4s, that were 3/4" x 1 1/2" x 13". The first step in assembly of the arm rests was to attach one of the horizontal supports to two of the vertical supports with two 1 1/4" screws. I then flipped this over and screwed another of the horizontal supports to the other side.

After the arm rest supports were completed I took them out to the porch to attach them to the swing. To do this it was easiest to remove two of the slats from the porch swing. I then drilled through the arm rest supports and the porch swing supports with a 3/8" drill bit. I fastened them with two 2 1/2" long bolts. Once the arm rest supports were in place I used two screws to fasten the arm rest tops to the supports. After installing the arm rests I cut the removed slats to their new length so they would fit between the arm rests and screwed them back in place.

Finishing the Porch Swing
With the construction of the porch swing complete, it could be coated with stain, paint or varnish. I planned to coat mine with polyurethane to give it a smooth, protected finish with a natural pine look. However, almost a year later, I still haven't gotten to it and the porch swing is still in just as great shape as the day I made it.
If the porch swing is going to be exposed to the elements it would definitely have to be given an exterior grade protective coating. This could be done after construction is complete, or each individual piece could be coated before final assembly to get a consistent finish to all sides of the parts.
Hanging the Homemade Porch Swing
Now that the porch swing was completed, all that was left to do was hang it. The first step was to add the four eye bolts to the porch swing. I used a hand held electric drill to drill a hole in the front vertical arm supports and a couple of inches from the top of the end back supports.
On each end of the porch swing I attached about a 40 inch section of chain between the two eye bolts. I then attached another section of chain from the middle of this chain, with the other end going to the ceiling. To hang it from the ceiling, I laid a 2x6 across the ceiling joists and ran two eye bolts through the ceiling and through the 2x6. I used two nuts per eye bolt above the 2x6.

I am very happy with the way the porch swing turned out. It is very comfortable and looks great. It was also very cheap to build and was almost entirely made out of 2x4 pine lumber.


Share and get 15% off!
Simply share this product on one of the following social networks and you will unlock 15% off!